

If you’re just getting started with sketch ideas in sketch for beginners, it can be daunting to know where to start – after all, there are countless tools and even more ways to use them. Here are 8 of the best sketch drawing ideas I’ve found to get you started on the right track! you will be drawing like an expert in no time! Follow this step-by-step guide and practice regularly and I promise you’ll soon have a collection of beautiful sketches that you can proudly show off to your friends and family.
Also Read: Photography Quotes That Will Inspire You
List Of All Sketch Ideas With Sketch Images:
1) How To Draw An Elephant – Sketch For Beginners
Sketch images
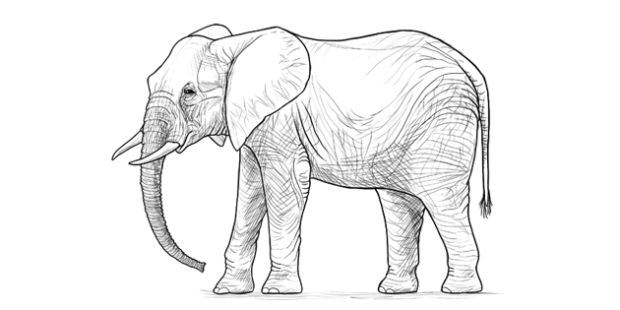
Are you looking for some sketch ideas? Maybe you want to learn how to draw an elephant. Well, here are some sketch images and tips to help you get started. Sketch the head with a simple triangle shape that is two times as wide as it is tall. Sketch the trunk by making a zigzag line on the bottom of the head shape with two straight lines on top. Add ears that look like triangles at the top of the sketch image. Now start sketching in detail by adding eyes, nostrils, tusks, and other features like wrinkles or skin fold around the mouth.
2) How To Draw A Dog – Sketch Drawing Ideas
Sketch images
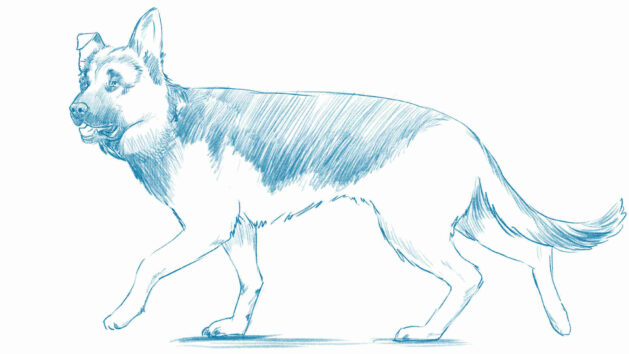
If you’re new to sketching, one of the best places to start is with dogs. They’re versatile subject matter that can be easy or complex depending on your skill level, and there are endless possibilities when it comes to sketch images. To get started, try some of these Sketch ideas for beginners:
- Start with a basic outline. Draw a circle for the head, an oval for the body, and four legs. Then add in the details like the eyes, nose, mouth, and fur.
3) How To Draw Cute Baby Elephant – Sketch For Beginners
Sketch images
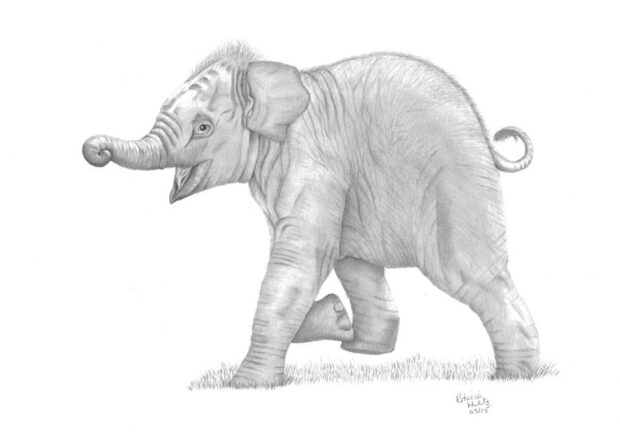
Assuming you want to learn how to draw a cute baby elephant, start by sketching out the general shape of the elephant. Add in the trunk, legs, and ears. Next, start to add in some details like the wrinkles on the trunk and around the eyes. Finally, add in any final details like shading and highlights. You should now have a drawing that looks something like this! It can be really fun to experiment with different styles as well.
4) How To Draw Sweet Cats – Sketch Drawing Ideas
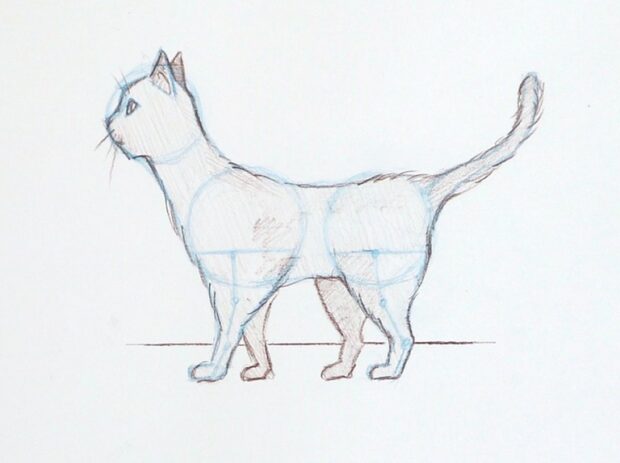
In this tutorial, we’ll be learning how to draw sweet cats. We’ll start by sketching a basic outline of the cat’s body. Next, we’ll add some details to the fur. Then, we’ll work on the face, including the eyes, nose, and mouth. Finally, we’ll add some finishing touches to the sketch.
5) How To Draw Paws – Sketch For Beginners
Sketch images
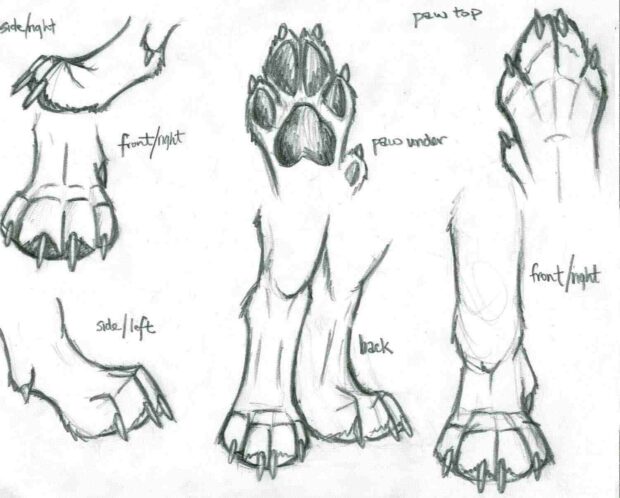
One of the most difficult things about learning how to draw is getting the proportions right. This is especially true when you’re drawing animals since they come in all shapes and sizes. But don’t worry, we’re here to help! In this blog post, we’ll show you how to draw paws that are both proportionate and realistic. Here’s what you need: a pencil, a sheet of paper, and an eraser. Follow these steps to get started with your sketching project.
Step 1 – Sketch Ideas:
Draw four boxes as guides for where to place your animal’s legs, one box on each corner of the page. These will help you keep track of where to put them later on in the sketching process.
Step 2 – Sketch Ideas:
Draw two more boxes across from each other near the bottom center of your page; these will be used for your animal’s back feet/legs and front feet/legs respectively. You should now have 6 boxes total in your sketch so far.
Step 3 – Sketch Ideas:
Now take the side guide for the top left corner of your page and flip it vertically so it becomes a guide for how long to make your animal’s body. You can then erase this square from the original position (don’t forget to erase its outlines too).
Once again, there should now be 6 squares remaining in your sketch. Put the second vertical line at the point where your first line intersects with the edge of your page. The length of this line should roughly match up to the height of your flipped guide at the top left corner. Put another vertical line close to it, but not quite at the same height as before; that new line will serve as a guideline for your animal’s head/neck area. Repeat these steps for any additional sketches you may want to do.
6) How To Draw Bird Nest in Tree – Sketch Drawing Ideas
Sketch Images

If you want to learn how to draw a bird’s nest in a tree, you first need to sketch out the basic shape of the tree. Once you have the tree sketched out, you can then start to add in the details of the leaves and branches. To draw the bird’s nest, start by drawing a small circle in the center of the tree. Then, add in some smaller circles around the outside of the nest to represent eggs. Finally, add in some small twigs and leaves to complete the nest.
7) How To Draw Heart-Shaped Nest With Birds – Sketch For Beginners
Start by sketching a heart shape in the center of your paper. Next, draw two small circles inside the heart for the birds. Add some lines around the edge of the heart for a nest. Now, start to sketch in some details like the bird’s beak and eyes. Finally, add some shading to give your drawing more dimension. You can use different pencils for this step.
For example, you can use lighter pencils for the outlines and darker pencils for the shadows. Then go over all of it with an eraser if you need to remove any mistakes. The easiest way is just to do it on a separate piece of paper first so that you don’t mess up your original drawing.
8) How To Draw Stag Beetle In Flight – Sketch Drawing Ideas
Sketch Images:
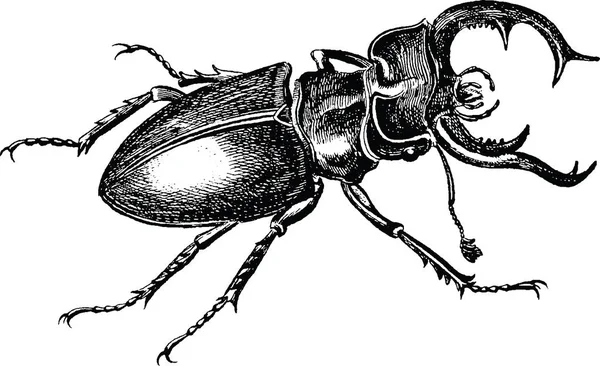
Next, we’re going to learn how to draw a stag beetle in flight! This sketch is perfect for beginners, as it uses simple shapes and lines to create the overall image. Follow along with the steps below to create your own flying beetle. Remember to be patient and work slowly!
Here are the supplies you will need: paper, pencil, eraser, ruler or straight edge, protractor (optional), compass (optional), and fine-point black pen.
Step 1:
First of all, use your ruler or straight edge to draw a straight line across the paper at least 10 cm long, and make sure it is vertical on the page. You can use either side of the ruler to do this – just remember that this line should be drawn vertically on the page!
It doesn’t matter which way up the ruler is, but if you’re struggling to get your line straight then keep turning the ruler until you find a point where it’s easy to draw a horizontal line across. If you don’t have access to an object like this then use something like a long piece of string or even some masking tape on the floor instead.
Step 2:
The next step would be using your compass (or something round) and pencil to draw two circles so they touch both ends of the vertical line without overlapping it. Then connect them together by drawing a short diagonal line from one circle to the other. Now you should have two half-circles with one long line connecting them on top.
From here, draw a small circle inside each half-circle and join these together by drawing another small diagonal line from one circle to the other again. These should now look like tiny triangles with a circular hole in the middle. Connect these little triangular holes to form four curved lines coming out of the central dot and voila, you’ve got yourself a very realistic-looking stag beetle in flight!
This list of sketch for beginners is by no means comprehensive, so feel free to add your own suggestions in the comments section below!


